7.5 KiB
CLIP using nVidia Tesla K20Xm
To use the old but cheap Tesla K20Xm with openAI Clip you need to downgrade torch and torchvision to a version that is still supported by this hardware. Sadly, building from source is the case.
Prerequisite
- Ubuntu 20.04
- miniconda from https://docs.conda.io/en/latest/miniconda.html
sudo apt -y install gcc-8 g++-8 git build-essential
CUDA
- nVidia Driver NVIDIA-Linux-x86_64-470.82.01.run
sudo apt install nvidia-settings- Build
check_cuda.cwithnvcc -o check_cuda check_cuda.c -lcuda - Verify the output of check_cuda:
Compute Capability: 3.5
Installing
Creating a Conda env
conda create --name clip_Tesla
conda activate clip_Tesla
Building PyTorch
switch to gcc8
sudo update-alternatives --install /usr/bin/gcc gcc /usr/bin/gcc-8 8
sudo update-alternatives --install /usr/bin/g++ g++ /usr/bin/g++-8 8
Verify
gcc --version
conda install astunparse numpy ninja pyyaml mkl mkl-include setuptools cmake cffi typing_extensions future six requests dataclasses
conda install -c pytorch magma-cuda101
change to a tmp dir
git clone --recursive https://github.com/pytorch/pytorch
cd pytorch
downgrade to 1.7.1
git checkout 57bffc3a8e4fee0cce31e1ff1f662ccf7b16db57
git submodule sync
git submodule update --init --recursive --jobs 0
build pytorch and install it
clear && TORCH_CUDA_ARCH_LIST="3.5 6.1" python setup.py install
run the torch_test.py to verify that CUDA is available and version:
True
1.7.0a0+57bffc3
Building TorchVision
change to a tmp dir
git clone https://github.com/pytorch/vision.git
cd vision/
git checkout 2f40a483d73018ae6e1488a484c5927f2b309969
conda install -c conda-forge ffmpeg
python setup.py install
Install CLIP
python setup.py install
Run the test
python clip_test.py
CLIP
[Blog] [Paper] [Model Card] [Colab]
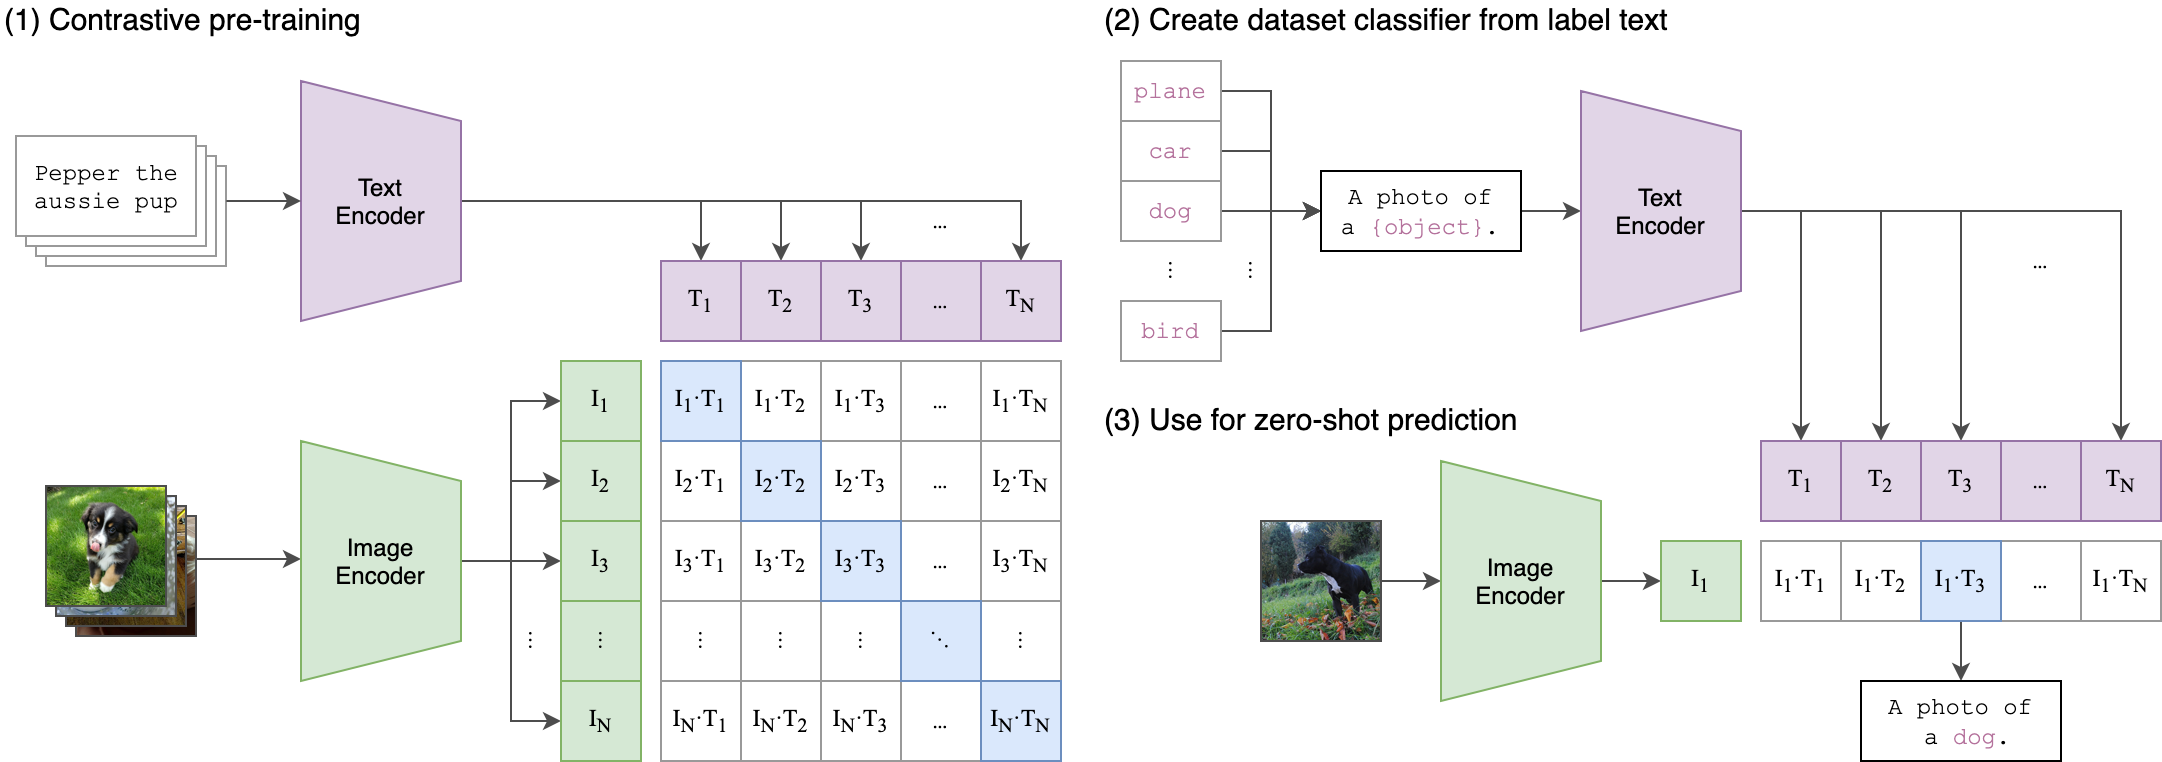
CLIP (Contrastive Language-Image Pre-Training) is a neural network trained on a variety of (image, text) pairs. It can be instructed in natural language to predict the most relevant text snippet, given an image, without directly optimizing for the task, similarly to the zero-shot capabilities of GPT-2 and 3. We found CLIP matches the performance of the original ResNet50 on ImageNet “zero-shot” without using any of the original 1.28M labeled examples, overcoming several major challenges in computer vision.
Approach
API
The CLIP module clip provides the following methods:
clip.available_models()
Returns the names of the available CLIP models.
clip.load(name, device=..., jit=False)
Returns the model and the TorchVision transform needed by the model, specified by the model name returned by clip.available_models(). It will download the model as necessary. The name argument can also be a path to a local checkpoint.
The device to run the model can be optionally specified, and the default is to use the first CUDA device if there is any, otherwise the CPU. When jit is False, a non-JIT version of the model will be loaded.
clip.tokenize(text: Union[str, List[str]], context_length=77)
Returns a LongTensor containing tokenized sequences of given text input(s). This can be used as the input to the model
The model returned by clip.load() supports the following methods:
model.encode_image(image: Tensor)
Given a batch of images, returns the image features encoded by the vision portion of the CLIP model.
model.encode_text(text: Tensor)
Given a batch of text tokens, returns the text features encoded by the language portion of the CLIP model.
model(image: Tensor, text: Tensor)
Given a batch of images and a batch of text tokens, returns two Tensors, containing the logit scores corresponding to each image and text input. The values are cosine similarities between the corresponding image and text features, times 100.
More Examples
Zero-Shot Prediction
The code below performs zero-shot prediction using CLIP, as shown in Appendix B in the paper. This example takes an image from the CIFAR-100 dataset, and predicts the most likely labels among the 100 textual labels from the dataset.
import os
import clip
import torch
from torchvision.datasets import CIFAR100

# Load the model
device = "cuda" if torch.cuda.is_available() else "cpu"
model, preprocess = clip.load('ViT-B/32', device)

# Download the dataset
cifar100 = CIFAR100(root=os.path.expanduser("~/.cache"), download=True, train=False)

# Prepare the inputs
image, class_id = cifar100[3637]
image_input = preprocess(image).unsqueeze(0).to(device)
text_inputs = torch.cat([clip.tokenize(f"a photo of a {c}") for c in cifar100.classes]).to(device)

# Calculate features
with torch.no_grad():
    image_features = model.encode_image(image_input)
    text_features = model.encode_text(text_inputs)

# Pick the top 5 most similar labels for the image
image_features /= image_features.norm(dim=-1, keepdim=True)
text_features /= text_features.norm(dim=-1, keepdim=True)
similarity = (100.0 * image_features @ text_features.T).softmax(dim=-1)
values, indices = similarity[0].topk(5)

# Print the result
print("\nTop predictions:\n")
for value, index in zip(values, indices):
    print(f"{cifar100.classes[index]:>16s}: {100 * value.item():.2f}%")
The output will look like the following (the exact numbers may be slightly different depending on the compute device):
Top predictions:

           snake: 65.31%
          turtle: 12.29%
    sweet_pepper: 3.83%
          lizard: 1.88%
       crocodile: 1.75%
Note that this example uses the encode_image() and encode_text() methods that return the encoded features of given inputs.
Linear-probe evaluation
The example below uses scikit-learn to perform logistic regression on image features.
import os
import clip
import torch

import numpy as np
from sklearn.linear_model import LogisticRegression
from torch.utils.data import DataLoader
from torchvision.datasets import CIFAR100
from tqdm import tqdm

# Load the model
device = "cuda" if torch.cuda.is_available() else "cpu"
model, preprocess = clip.load('ViT-B/32', device)

# Load the dataset
root = os.path.expanduser("~/.cache")
train = CIFAR100(root, download=True, train=True, transform=preprocess)
test = CIFAR100(root, download=True, train=False, transform=preprocess)


def get_features(dataset):
    all_features = []
    all_labels = []

    with torch.no_grad():
        for images, labels in tqdm(DataLoader(dataset, batch_size=100)):
            features = model.encode_image(images.to(device))

            all_features.append(features)
            all_labels.append(labels)

    return torch.cat(all_features).cpu().numpy(), torch.cat(all_labels).cpu().numpy()

# Calculate the image features
train_features, train_labels = get_features(train)
test_features, test_labels = get_features(test)

# Perform logistic regression
classifier = LogisticRegression(random_state=0, C=0.316, max_iter=1000, verbose=1)
classifier.fit(train_features, train_labels)

# Evaluate using the logistic regression classifier
predictions = classifier.predict(test_features)
accuracy = np.mean((test_labels == predictions).astype(np.float)) * 100.
print(f"Accuracy = {accuracy:.3f}")
Note that the C value should be determined via a hyperparameter sweep using a validation split.